How to define Delivery Rules for a banner
in Revive Adserver
This article explains how to set delivery rules in order to make a banner appear only when certain conditions apply.
Introduction
In Revive Adserver, you can specify rules that determine if a banner can be displayed or not. This approach enables you to very precisely define where, when, or under what circumstances a banner can be delivered. This is done by setting ‘delivery rules’ on the banner. In other ad serving systems, this is often referred to as ‘targeting’.
Accessing the Delivery Options for a banner
There are multiple ways to access the Delivery options for a banner.
In the Overview of all banners in a campaign, click the Delivery Options link for the banner you’d like to set rules for.
Each of these will open the Delivery Options screen, on which you can specify the delivery rules for the banner.
Select Delivery Rule type
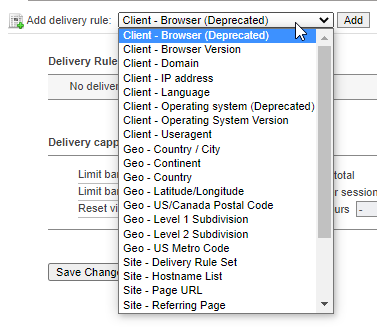
Under the banner’s preview (if you have previews enabled), there is a drop down list called “Add delivery rule”. Click the control to reveal the full list of available delivery rules.
The Revive Adserver software had a long list of delivery rules available. This article will discuss just the most commonly used delivery rules, there is a separate article explaining the more advanced rules.
Add the delivery rule to the banner
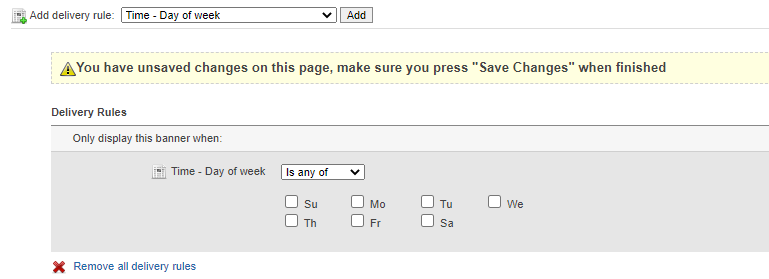
After you’ve selected one of the available delivery rules, click the Add button to add it to the banner. In this first example, we’ve picked the “Time – Day of Week” rule.
The screen will update and you will see the additional details for the delivery rule displayed, along with a note to alert you that there are unsaved changes.
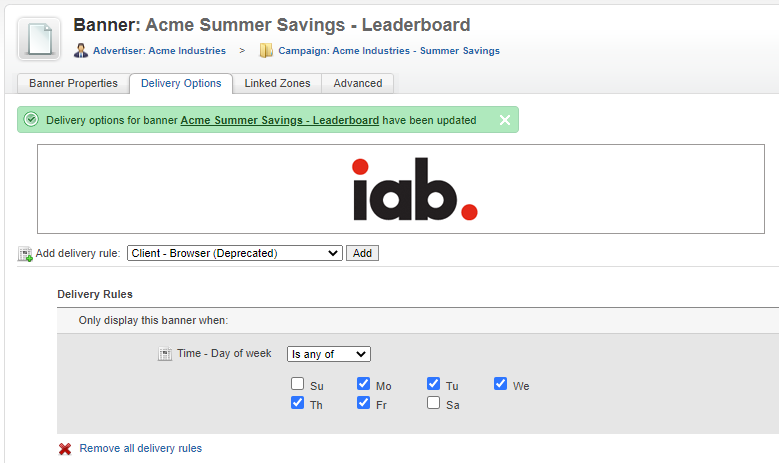
Let’s imagine that the advertiser has indicated that the banners for this campaign must only be displayed on weekdays, since it is a business oriented campaign. Simply tick the checkboxes for Monday – Friday, and then click the “Save changes” button at the end of the screen. The screen will refresh, and the delivery rule that has just been set is now displayed for your reference.
Combining multiple delivery rules for a banner
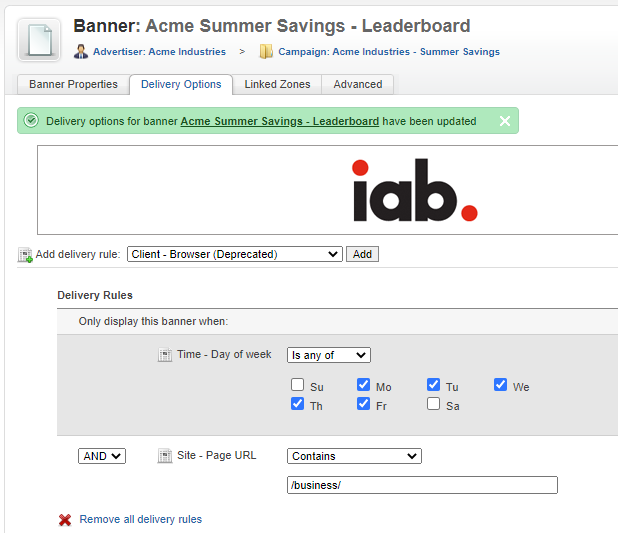
It is possible to to define more than one delivery rule for a banner, and to combine these rules with either an AND or an OR rule. Here is an example of how to set an additional rule that specifies that the banner is allowed to appear only when the page URL of the website is part of the business section of an imaginary regional newspaper website. Those pages can be identified by having the exact string “/business/” in their URL.
Note that we’ve used the “AND” operator to indicate that both rules must apply in order to allow the banner to be displayed. So this banner will only be displayed if the day of the week is Monday – Friday AND the page URL contains the term “/business/”.
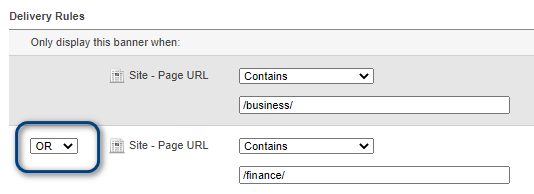
If you’d have chosen the “OR” operator, then the banner would be allowed to display if the day of the week is Monday through Friday, or if the page URL contains the term “/business/”, or both.
AND and OR work the way they work for computers, which is not always interpreted the same way in human language. For example, a human could say “this banner is allowed for the business and finance sections of your website”. Note the word ‘and’ in that sentence. A computer would need to be instructed using the OR operator to make this work, as in this example:
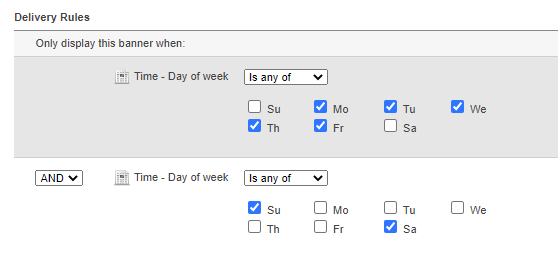
The incorrect use of the AND and OR operators can cause unintended results. For example, you could accidentally set two delivery rules that contradict each other and thus result in the banner not displaying at all, as in this example.
The reason this will not work, is because it can not multiple days of the week at the same time. These two conditions can never be ‘true’ at the same time, and therefore this banner will never be displayed.
Geotargeting
A common use case for delivery rules is to define targeting for geographical locations. This is often referred to as Geotargeting.
The way this works is by taking the IP address of the site’s visitor and looking up their geographical location. This will return things like the continent, country and city. The banner will then only be displayed if the location of the visitor matches the banner’s rules.
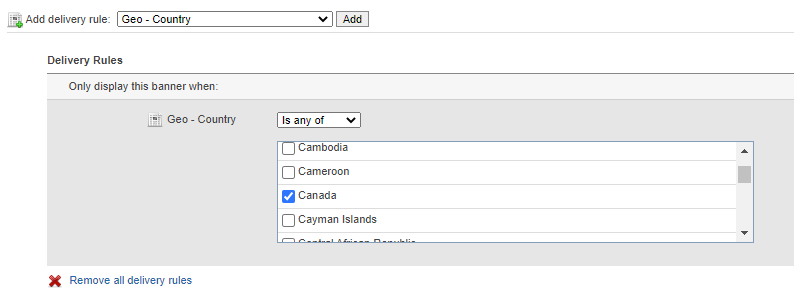
For example, on a site in North America that draws visitors from both the United States and Canada, an advertiser with stores in Canada only might ask for the display of the banners to be limited to visitors from Canada.
To do this, first select the rule “Geo – Country” and add it. Then select Canada in the list of all countries, and save the changes.
Unlimited combinations
With so many delivery rules, and with the ability to combine them with the AND and OR operators, you can literally create an unlimited number of combinations. It is practically impossible to list all possible combinations and use cases, but most of the delivery rules are self-explanatory.
Copy Delivery Rules
When working on a campaign with multiple banners in it, sometimes all of these banners need to have the same delivery rule(s) applied to them.
Instead of having to manually define such rules for every single banner seperately, there is a much more efficient method available.
Start by defining the required delivery rules for one of the banners in the campaign, following the steps and hints outlined above.
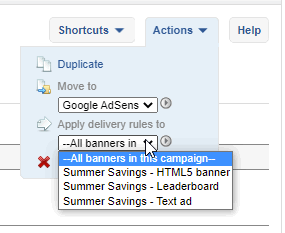
Once the rules are in place for that banner (and after making sure they have been saved), you can use the “Actions” button on the top right hand side of the screen to open a menu of additional tools.
Under the heading for “Apply delivery rules to”, you have the option to copy the rules to all the other banners in the same campaign, or you can select one of the other banners in the campaign specifically.
Once you’ve selected the target, click the small round grey button with the arrow in it to execute the selected action.
Keep in mind that any delivery rules already present on the target banner(s) will be overwritten!
Delivery Rule Sets
Once you’ve mastered using Delivery Rules for Banners, you could learn about using sets of Delivery Rules. These can save you substantial time.
Pro Tip
Pro Tip
How to target ads to a specific browser.
Delivery capping per visitor
Under the screen section displaying the delivery rules, there is another section where you can specify delivery capping rules. This is very similar to delivery capping for campaigns.
In this section, you can specify how often an individual visitor gets to see the banners of the campaign.
- You can limit the number of impressions per visitor for the entire duration of the campaign.
- You can limit the number of impressions per visitor per session. A session ends when the visitor closes their browser (for example by shutting down their computer).
- You can also force the Revive Adserver software to restart its counters for impressions after a number of hours, minutes and seconds.
Frequency capping uses cookies to store the impression counters. On a browser that does not accept these cookies (for whatever reason) the Revive Adserver will not display the campaign at all, just to be on the safe side.
If you set delivery capping on both a campaign and on a banner in that campaign, the banner’s capping rules will override those of the campaign.
Articles about How to Use Revive Adserver
Websites
Check out the Hosted edition of Revive Adserver
Keen to start using the Revive Adserver software, but not so keen to download and install it on your own server? Revive Adserver Hosted edition might be just right for you!


