How to create Zone Invocation Code
in Revive Adserver
This article explains how to create a Zone’s Invocation Code that needs to be placed in your website in order to display the zone’s banners on the site.
Introduction
Once a zone has been created, you can retrieve a little piece of code that needs to be placed inside your website. In other ad serving systems, these pieces of code are sometimes referred to as ‘tags’. The Revive Adserver software uses the term ‘invocation code’.
When someone visits your website, their web browser will receive the HTML code of the webpage. The HTML code also contains the aforementioned zone invocation code. The browser executes this code and as a result, one of the banners that’s linked to the zone gets displayed.
Navigate to the zone’s Invocation code tab.
There are multiple ways to navigate to the Invocation code page for a zone.
In the Zone overview for any of your defined websites, click the “Invocation Code” link to the right of the zone’s name.
While viewing the properties of the zone you are working on, click the “Invocation code” tab.

Copy the invocation code
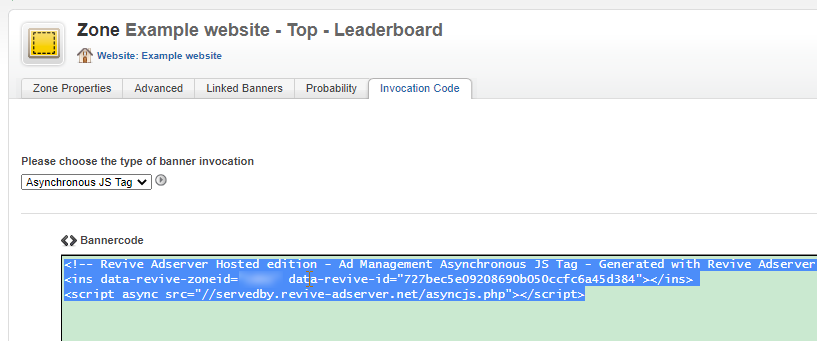
In the Invocation Code tab, the Revive Adserver software displays the little piece of code that needs to be placed in your website.
Just above the box showing the invocation code, there is a dropdown that enables you to select several different types of invocation. By default, the “Asynchronous JS Tag” is selected. Unless you know exactly what you’re doing, we strongly recommend that you always use this type of code.
Simply point your mouse at the code inside the box once, and then press the ‘copy’ shortcut keys defined for your computer. On a Windows computer, this is Ctrl-C, on an Apple Mac computer this is Command-C. This places the zone’s invocation code snippet on the clipboard of your computer.
Now go to the website to paste the code snippet into the correct location. This will vary depending on the type of software you’re using to build the website. Consult the manual or documentation for your website’s software, or ask the web developer, webmaster, or supplier of the software for assistance.
Explanation of the invocation code
Here is an example of a zone’s invocation code:

The first line is simply a comment for you or others, so that you will know what the purpose of the code is if you see it again in the future.
The second line defines a number of variables:
- The ID of the zone
- A hashed version of the ad serving URL. This is included in order for a website to be able to display ads from multiple installations of the Revive Adserver software on a single web page.
The third line executes the ad server request by calling the asyncjs.php command of your ad server. The ‘async’ attribute in this line instructs the web browser to start this only after the rest of the page has been retrieved and rendered, in order to make sure that the content of the page is always displayed first, and also to make sure that the page will work even in the event that the ad server does not work for whatever reason.
Do not change the invocation code!
The second and third lines must always be kept together. If you have multiple zones that need to be displayed on a single web page, then the Revive Adserver software will piece all of the zones together into a single request to the ad server. This ensures that the process of calling the ad server is as efficient and fast as possible.
NEVER make any changes to the invocation code that the Revive Adserver software generated for you, unless you know exactly what you are doing.
Once you’ve copied more than one zone’s invocation code, you might start to notice that the code is almost identical for each zone. The only difference between them is the value of the zoneid variable in the second line. If you feel comfortable about making manual changes, you code simply use the invocation code of one zone as a template, and manually replace the zone ID with the appropriate value for the other zone(s).
Tag settings
There is a separate article explaining how to use the various controls in the ‘tag settings’ section underneath the code box.
Articles about How to Use Revive Adserver
Websites
Check out the Hosted edition of Revive Adserver
Keen to start using the Revive Adserver software, but not so keen to download and install it on your own server? Revive Adserver Hosted edition might be just right for you!


