How to create an HTML banner
in Revive Adserver
This article explains how to create an HTML banner, most commonly used to enter third party ad codes, for example Google AdSense.
Introduction
There is an article explaining how to create a regular image banner in Revive Adserver, and another article explaining some of the other types of banners.
This article specifically shows how to create a HTML banner. These types of banners are most often used to serve ad codes provided or generated by external systems. One very commonly seen use case is to serve Google AdSense ads through Revive Adserver.
Note that Revive Adserver also supports the special HTML5 format. There is a separate article explaining How to Create an HTML5 banner in Revive Adserver.

Getting started
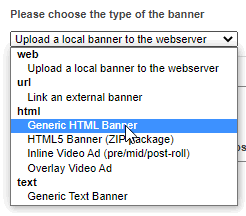
Start by clicking the “Add new banner” link as usual. In the drop down list for the various banner types available, select the option “Generic HTML banner”.
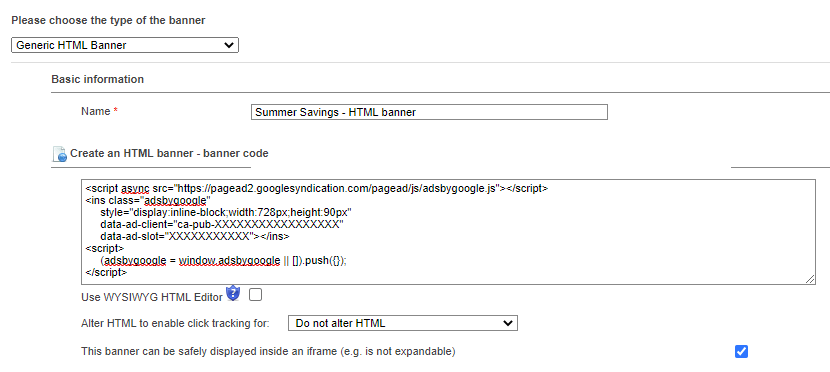
As soon as you select that option, the layout of the New banner screen will change to reflect the fields necessary for an HTML banner.
Basis information
Enter the name for the new banner, making sure it’s clear and concise. This name will appear in overviews and statistics later, so a clear name will help you recognize what’s what later on.
Banner code
In the large box, enter or paste the HTML code needed for the banner. This can be any piece of valid HTML code, including javascript.
Here is an example of a Google AdSense tag that was retrieved from Google’s interface and pasted into the box.
Counting clicks
In almost all cases, it is recommended to open the list labeled “Alter HTML to enable click tracking for” and then to select “Do not alter HTML”.
Because Google AdSense tags change all the time, and don’t allow for tracking clicks on them easily, we recommend not to attempt click tracking on these tags.
If the HTML code being entered has a <A> tag in it, you can also select “Generic HTML Banner”. In that case the Revive Adserver software will attempt to identify the link and add a click counter to it.
Only ever use any of the other options in this list if you know exactly what you’re doing or have been instructed specifically to use it.
There is a checkbox, which is enabled by default, that informs the Revive Adserver software that “This banner can be safely displayed inside an iframe (e.g. is not expandable)”. In case you’re adding some third party code that’s intended to be expandable, for example on hover, then make sure to uncheck this box.
Banner display
Enter the size of the HTML ad by specifying the width and the height, expressed in pixels. This is usually provided by the advertiser or their agency, or defined in AdSense for example.
Make sure to enter the dimensions correctly, otherwise the ad will look chopped or skewed when displayed on the website.
Additional data
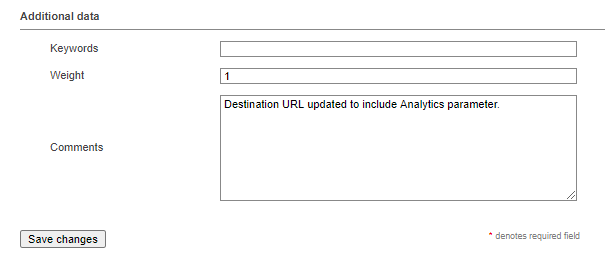
The Keyword field is available for advanced use cases that are outside of the scope of this article. We do not recommend entering anything here. If you do enter something, it will almost certainly be completely ignored.
The weight field can be used to specify a numerical value that determines how often this particular banner gets displayed relative to the other banners in the same campaign. There is a separate article explaining how to use Banner weights.
The comments field can be used to enter some notes about the banner, for example to record when and what is changed or by who.
Don’t forget to save the new banner (or to save whatever changes you’ve made to an existing banner).
Articles about How to Use Revive Adserver
Websites
Check out the Hosted edition of Revive Adserver
Keen to start using the Revive Adserver software, but not so keen to download and install it on your own server? Revive Adserver Hosted edition might be just right for you!


