How to test an ad on the site without visitors seeing it
Using Revive Adserver
This article shows and explains a simple but effective trick to help you display an ad on your site without visitors seeing it yet.
Here’s a user question we’ve seen a number of times:
We would like to be able to test new banners in Revive Adserver and see them on the website to make sure that they work correctly.
For example, that would enable us to verify that the ads do not interfere with other content on the pages. Or we could show the ads on our live site to an advertiser or agency first.
However, until we have completed our checks, we don’t want the visitors of the site to see the ads yet. Is there a way to do this?
This is not at all difficult, it involves making use of the targeting feature in Revive Adserver to ensure the ad will only be visible to you. There are actually multiple ways to do this, including:
- You could look up the IP address of the internet connection at your office and use that to target the ad to be displayed only at that IP address;
- You could setup the ad so that it is displayed when some word or phrase is present in the URL of the website, and then add this phrase to your web address for testing purposes.
Preparing the banners in a campaign for testing
To prepare the banners for testing, just create the campaign and the banners like you would normally do, and then go to the “Delivery Options” tab of the banner to add a new targeting rule:
Then, use the “Add delivery limitation” drop down and select “Site – Page URL”:
Click the “Add” and then fill out the form as follows:

It doesn’t really matter what the phrase is that you use here, the only requirement is that the phrase is unlikely or impossible to be part of a real page URL on the site.
Don’t forget to save the changes!
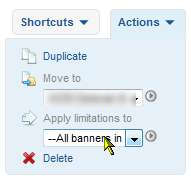
If your campaign has multiple banners, you can copy this delivery limitation to the other banners in one click, by using the “Actions” button:

Once you’ve completed this, you can link the campaign and/or the banners to the relevant zones just like you’re used to.
Testing the banners on the site
Now that you’ve prepared the campaign for testing, it’s time to test the banners on the live site. This is the easy part. Just open your browser and go to the web page address where the banners should be displayed. Let’s assume here that you’re working on the home page of a website at www.example.com.
Now, in the address bar of your browser, add a parameter to the URL that matches the phrase you’ve used for the Page URL delivery limitations:
You may have to refresh the page a couple of times if there are other campaigns that are active on the same zones on this web page, but eventually you should see the banner(s) of the campaign you’re testing.
Once you’ve made sure the banners work well, you can simply go back to the delivery limitations tabof the banners being tested and remove the temporary delivery limitations. To do that, simply click the red ‘cross’ symbol to the right of the delivery limitations, and then save the changes on the page.
Articles about How to Use Revive Adserver
Websites
Check out the Hosted edition of Revive Adserver
Keen to start using the Revive Adserver software, but not so keen to download and install it on your own server? Revive Adserver Hosted edition might be just right for you!
